

Xholon with TOPCASED HelloWorld Tutorial
How to create a TOPCASED model that can be transformed to a Xholon app
EARLY DRAFT - not yet completely tested
This describes how to create a model using TOPCASED (tested with version 1.0.0 M4.1) that can be executed using the Xholon runtime framework. The model will be converted from XMI (.uml) format to the Xholon XML and Java format, and will then be executed using the Xholon runtime framework. The last page in this document is a set of issues.
Start up TOPCASED (http://topcased-mm.gforge.enseeiht.fr/). Switch to the Topcased modeling perspective (Window --> Open Perspective --> Other --> Topcased Modeling). Create a new project (File --> New --> Project --> Eclipse Modeling Framework --> Empty EMF project), and name the project HelloWorldTutorial. The project will be created with a folder called "model". Right-click on this folder, and select New --> UML Diagram. Enter "HelloWorldTutorial" as the Model name. Select "Class Diagram" as the Template. HelloWorldTutorial. Two files will be created in the model folder, a .uml model file, and a .umldi diagram file.
Open the .umldi file by double clicking on it, if it hasn't been automatically opened. You should see an Outline browser as well as the graphical viewer.
You should see a node called Additional Resources in the Outline browser. Right-click on this, and select Load Resource. Select Browse File System, navigate to the Xholon/transform/Topcased folder, and select XholonStereotypes.uml. Press OK. In the Outline browser, select <Model> HelloWorldTutorial, right-click Apply Profile, select XholonStereotypes and "Add" it to the list of Features. Press OK. You will now be able to apply necessary stereotypes to several of the classes that will be created as part of this tutorial.

XholonClass
Create a root class owned by the HelloWorldTutorial model. To do this, right-click <Model> HelloWorldTutorial in the Outline browser. Select Create child --> Packaged Element | Class. Name the class XholonClass. Set the following properties by selecting XholonClass in the Outline browser, and editing its Properties in the Properties pane.
- Stereotypes: XholonStereotypes:PureContainer (select Stereotypes, then select XholonStereotypes:PureContainer, and then press Add>)
- Visibility: Public (this is the default)
- IsActive: false, IsAbstract: true
If not already created, create a package called HelloWorldTutorial. To do this, right-click <Model> HelloWorldTutorial, select Create child --> Packaged Element | Package, and name it HelloWorldTutorial.
Create a class diagram that can be used to create classes. To do this, right-click <Package> HelloWorldTutorial, select Add diagram --> Class Diagram, and name it InheritanceHierarchy. Open the new class diagram by double clicking on the icon in Outline.
Drag the XholonClass class from the Outline browser to the class diagram.
Create three classes within the new HelloWorldTutorial package. It's easiest to do this by clicking the Class symbol in the class diagram menu, and then clicking within the diagram itself. Name the three new classes as follows:
HelloWorldSystem
Hello
World
- Superclass for all three: XholonClass. (You can do this by selecting the Generalization icon from the class diagram menu, clicking on the class, moving the mouse until the cursor is over XholonClass, and then clicking the mouse button again.)
- Stereotype for Hello and World: PureActiveObject
Make sure that the three new classes are within the HelloWorldTutorial package. If they are not, drag them inside using the Outline browser. XholonClass should remain within the HelloWorldTutorial model rather than within the package.
Create a Signal class within the HelloWorldTutorial package. Do this in the Outline by selecting <Package> HelloWorldTutorial --> Create child --> Packaged Element | Signal. Name the new Signal class SIGNAL_ONE. Create an attribute for the Signal, by selecting <Signal> SIGNAL_ONE --> Create child --> Owned Attribute | Property. Open the properties pane for the new attribute Property. Select Default (under the Advanced tab) and enter the value 100, set Is Read Only to true, and set Visibility to Public. No other fields need to be set. The attribute should not have a Name.
Create a Signal Event class within the HelloWorldTutorial package. Do this in the Outline by selecting <Package> HelloWorldTutorial --> Create child --> Packaged Element | Signal Event. Name the new Signal Event class SIGNAL_ONEse. In its properties pane (Advanced tab), select <Signal> SIGNAL_ONE as its Signal.
Create an Interface within the HelloWorldTutorial package. Do this by clicking the Interface symbol in the class diagram menu. Name the interface IHwIn. Then select the Property symbol in the menu, move the cursor until it's over the new Interface rectangle in the diagram, and click to create a new attribute. The new attribute should have a Visibility of Public, should have no Name, should have a Type of <Signal> SIGNAL_ONE (the Signal class created above), should have Is Read Only = true and Is Static = true. (see note at end of this document re signals as attributes of an Interface rather than as operations)
Create a second Interface called IHwOut. It should have the same attribute as for the IHwIn interface.
Create a Port class within the HelloWorldTutorial package, using the class diagram. Create a normal Class called Partner.
Partner
- Add an attribute (Property) with a Default value of 0. Don't give the attribute a Name or a Type. Open the properties pane for this attribute, and set:
- - Visibility: Public
- - Is Read Only: true
- - Is Static: true
- In Java, this is equivalent to:
- public static final int Partner = 0;
Select Interface Realization from the Class diagram menu. Click on the Partner class, move the mouse over the IHwIn interface, and click the mouse button again. In the Outline browser, create a new Usage, by selecting <Package> HelloWorldTutorial --> Create child --> Packaged Element | Usage. In the properties pane for this new Usage, set the Client to <Class> Partner and the Supplier to <Interface> IHwOut. This specifies that IHwIn is a provided interface for the Partner port class, and that IHwOut is a required interface for the Partner port class. In this simple example, the provided and required interfaces each have one and the same signal. A Partner port is symmetrical. It allows the same signal type (SIGNAL_ONE) to be sent in both directions.
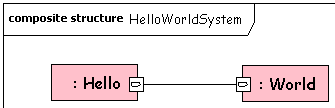
Create a composite structure in which HelloWorldSystem contains two parts, Hello and World. Hello and World will each have one port. These two ports will be connected using a connector.
To do this, in the Outline browser, right-click the HelloWorldSystem class. Select Add Diagram --> Composite Structures Diagram (Classifier View). Name this diagram HelloWorld_CompositeStructure.
Within the new composite structure diagram, select the Part icon, move the cursor over the HelloWorldSystem rectangle, click, select Hello, and press the OK button. The part does not need to have a name. Make sure you are selecting the Part icon and not the Port icon.
Select the Part icon again, move the cursor over the HelloWorldSystem rectangle, click, select World, and press the OK button.
Select the Port icon (Port rather than Part), move the cursor over the Hello rectangle, click, select Partner as Type, and click OK. Create a similar Port for World.
Click on each of these new ports in the diagram, and set its properties as follows:
- Name: use any name you want (such as ph and pw), or leave the name blank.
- IsService: false (Hello), true (World)
- IsBehavior: true
Click on the Connector icon, move the cursor over the Hello Partner port, click, move the cursor to the World Partner port, and click again. Make sure that you click while over the port and not while over the part that owns the port. Open the properties for the connector, and confirm that Kind has the value Assembly. You can optionally turn off display of the two "1" labels in the diagram, by selecting Graphics --> Visible Elements --> Hide>.
You should now have a diagram that looks like the following:
State Machines
Add a state machine to Hello.
To do this, in the Outline browser, right-click Hello, select Create child --> Owned Behavior | State Machine. Then right-click on the new State Machine, and select Add Diagram --> State Machine Diagram. Name the state machine StateMachine_Hello. This will create a State Machine Diagram within a State Machine.
Within the new state diagram, create a Region, and then create a Composite State inside the Region. Name the composite state Top. Put an Initial pseudostate and State inside the composite state, as shown in the following diagram. Name the state SayingHello. Draw a Transition from the Initial pseudostate to the SayingHello state. Also draw a self transition on the SayingHello state. You can do this as a regular Transition that starts and ends in the same state.

Click on the initial transition and open its properties pane. Leave the Name blank. In the Outline browser, right-click on the transition, and select Create child --> Effect | Opaque Behavior.
Find the Body property of the Opaque Behavior. Enter the following two lines of Java code, to ensure that Hello will initiate a series of back and forth messages between itself and World when the model executes:
print("{Hello "); port[Partner].sendMessage(SIGNAL_ONE, null, this);
Click on the self transition in the state diagram, and open its properties pane.
- Name: CNPT_OUTGOING1 (name must end with the digit 1)
- Triggers --> Add (EventType: <SignalEvent> SIGNAL_ONEse)
In the Outline browser, right-click on the transition, and select Create child --> Effect | Opaque Behavior.
Enter the following two lines of code in the Body attribute of the Opaque Behavior:
print("{Hello "); port[Partner].sendMessage(SIGNAL_ONE, null, this);
Add a similar state machine to World. The only differences are that the state is called SayingWorld, and that there is no Opaque Behavior and therefore no code associated with the initial transition.

Enter the following two lines of code in the World self transition:
println("World}"); port[Partner].sendMessage(SIGNAL_ONE, null, this);
Save the Topcased model in its default format (a .uml file and a separate .umldi file), to the Xholon/transform/Topcased directory. This is the default Topcased format, a uml XMI 2.1 file.
How to transform the TOPCASED model into a Xholon application
If you are using Microsoft Windows, open a console window. Change to the Xholon/transform/Topcased directory. Run the following command:
xmi2xh all HelloWorldTutorial HelloWorldSystem (if using Windows/DOS) ./xmi2xh all HelloWorldTutorial HelloWorldSystem (if using Linux/Unix)
For detailed information see _README.txt in the Topcased directory. You will need a third-party XSLT tool to be able to run the xmi2xh script. The result should look similar to the following:
Extracting: HelloWorldTutorial.uml creating InheritanceHierarchy XML file ... creating ClassEnum Java file ... creating CompositeStructureHierarchy XML file ... creating ClassDetails XML file ... creating Xh Java file ... creating App Java file ... creating Information XML file ... creating _xhn XML file ...
The three Java files are generated in the Xholon\src\org\primordion\xholon\xmiappsTc directory. The five XML files are generated in Xholon\config\xmiappsTc\HelloWorldTutorial.
How to execute the generated Xholon application
Compile the generated Java files - AppHelloWorldTutorial.java, XhHelloWorldTutorial.java, and CeHelloWorldTutorial.java.
Execute the application from the command line or using the Xholon GUI, as described in README.txt in the Xholon root directory. To use the Xholon GUI, change to the root Xholon directory, enter xhn Xholon (Windows/DOS) or ./xhn Xholon (Linux/Unix). From the GUI menu, select File --> Open --> xmiappsTc --> HelloWorldTutorial --> HelloWorldTutorial_xhn.xml and press the Open button. Select Controller --> Start. You should see the following output in the console window:
{Hello World} {Hello World} {Hello World} {Hello World} {Hello World} {Hello
Notes/Issues
- This tutorial implies that signals are attributes of an Interface. UML2 specifies that they should be operations. For practical purposes, Xholon expects them to be attributes. This needs to be thought through in more detail.
- All of the classes are IsActive = false. Hello and World are Xholon active objects and could be IsActive = true. Is there any practical advantage to doing this? UML2 defines "active object" as an object that has its own thread of control (UML Superstructure document, version 2, formal/05-07-04). Xholon active objects may or may not fit the UML2 definition.
- It seems there is no need to create separate Composite Structure Diagrams for Hello and World, because they have no internal parts, and the ports can be added from within the Composite Structure Diagram for HelloWorldSystem. But it might be good style to create these separate diagrams.